Nuxt.js is a static site generator powered by Vue.js that makes it really quick and easy to get started on a high performance website and allows you to take advantage of everything in Vue. As an alternative to Gridsome, it's worthy of consideration.
I will go through the steps required to get started with a project, using Tailwind and Typescript to show some examples working with git-based content as a source, as well as briefly touching on using an API. I will also list a few very useful modules that you will probably need, like sitemaps and dark mode.
Installation
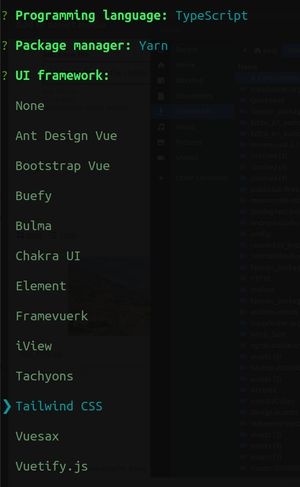
For installation we will be using the create nuxt-app command. This will give us an interactive menu to help us get everything we need set up.
yarn create nuxt-app getting-startedFor each step you have a wide selection of options. Out of the box it will ask you for a preference of Javascript or Typescript, Yarn or NPM, and a long list of CSS frameworks.
The next step is to choose some additional Nuxt modules you want to start with from a list of:
- Axios
- Progressive Web App (PWA)
- Content
We will just choose Content for this, but if we wanted an API integration then Axios could also be added.
I will skip adding linting tools, but it's highly recommended that you use some linters – at a minimum ESLint and Stylelint – for your projects.
Universal will be static site generation (SSG) or server side rendering (SSR), and single page app (SPA) is rendering at run-time. We will go with the ‘Universal’ option. For your deployment target you will want to choose ‘Static’, as we are not going to be doing any SSR.
The remaining steps are only around version control and GitHub.
Don't worry too much about what you choose here because everything can be changed later with configuration, or by extending your Webpack compiler should you need to.
You should see a success screen next!
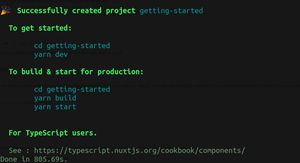
You can now bring up the application using:
yarn devIf you are running this in a container you may want to pass it some flags for the host and port:
yarn dev --hostname 0.0.0.0 --port 80Your project should now be up and ready for development.

Getting started
The first step is to familiarise yourself with the nuxt.config.js file as this controls the entire application from imported modules to build destination. The official documentation has a list of all configuration options.
Let's start by adding in a stylesheet. We can do this by adding our file to the config; most file paths will be relative to the configuration. In /assets/css/ I will create a main.css file and then add it to the 'css' config object.
css: [
    // SCSS file in the project
    '@/assets/css/main.css',
  ],
Now we can start using CSS! If you want to use SASS instead, you will need to install the relevant modules and loaders.
Next up is Tailwind. It should work right now, but it's worth adding a tailwind configuration file for any overrides or extensions you want. All you have to do is create a tailwind.config.js file next to the nuxt config file. Here is a good example:
/*
** TailwindCSS Configuration File
**
** Docs: https://tailwindcss.com/docs/configuration
** Default: https://github.com/tailwindcss/tailwindcss/blob/master/stubs/defaultConfig.stub.js
*/
module.exports = {
  experimental: {
    darkModeVariant: true,
  },
  purge: {
    // Learn more on https://tailwindcss.com/docs/controlling-file-size/#removing-unused-css
    enabled: process.env.NODE_ENV === 'production',
    content: [
      'components/**/*.vue',
      'layouts/**/*.vue',
      'pages/**/*.vue',
      'plugins/**/*.js',
      'nuxt.config.js'
    ]
  },
  dark: 'class',
  theme: {
    screens: {
      md: '768px',
      lg: '1200px',
      xl: '1920px',
    },
  },
  variants: {
    backgroundColor: ['responsive', 'hover', 'focus', 'dark'],
    borderColor: ['responsive', 'hover', 'focus', 'dark'],
    boxShadow: ['responsive', 'hover', 'focus', 'dark'],
    textColor: ['responsive', 'hover', 'focus', 'dark'],
    textDecoration: ['responsive', 'hover', 'focus', 'dark'],
  },
}
I'm enabling dark mode because I think it's a common enough feature that it should be covered, so I will explain how to use it soon enough.
Adding content with markdown
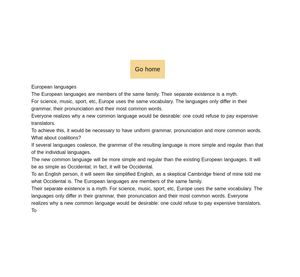
We will be adding content using markdown files, although Nuxt supports other file types like YML. This is all handled automatically for us using the ‘@nuxt/content’ module, so all we have to do is add our content to the content directory. Using a demo.md file with some lorem ipsum, we can make a specific page for it too. So in pages, create a demo.vue page next to the index that contains the following code:
/* demo.vue */
<template>
  <div class="container flex-col">
    <nuxt-link to="/" class="p-4 bg-orange-300 text-xl">Go home</nuxt-link>
    <div class="mt-4 text-left">
      <nuxt-content :document="page" />
    </div>
  </div>
</template>

<script>
import Vue from 'vue'
export default Vue.extend({
  async asyncData ({ $content }) {
    const page = await $content('demo').fetch()

    return {
      page
    }
  }
})
</script>
First you'll notice the <nuxt-link> component. This will just create an anchor for us while providing certain benefits around the internal routing such as page transitions we could take advantage of. You should try to use this component for any internal routes as it is also responsible for figuring out what pages will be built for the static site. It's basically <router-link> with extra features!
The <nuxt-content> component is provided by the module and will let us render the content that we fetch from our files, replace ‘demo’ in the async await function with your markdown file and its content should display correctly. This also allows you to have a file directory structure for different types of content, such as ‘Articles, Projects’ and you can then dynamically pull in that data and display them on individual pages using slugs.
This component will also provide you with live editing when in development mode.
In the index.vue I will just replace the existing links with a nuxt-link to our new demo page.
<div class="links">
   <nuxt-link to="/demo" class="button--green">View demo</nuxt-link>
</div>
Now we can go between the index page and our new demo containing our markdown!
Adding content with an API
Using an API will be quite similar. Instead of fetching data from markdown you will use an async await for an API response. How you do that is entirely up to you; I recommend creating a new api folder and adding your API helper functions there. You can use Vuex to store your data from the API, but this is not entirely necessary when making a static site unless you're rate limited or handling a large amount of data.
As long as you're using the <nuxt-link> component to link to each piece of content you're pulling in, then Nuxt will know how to build a page and route for that content.
Metadata and sitemaps
Let's assume you've now built most of the pages that you need and they're all styled. You just need to handle the meta data, start by adding the head: object to your config:
head: {
    title: 'Getting started with Nuxt',
    meta: [
      { charset: 'utf-8' },
      { name: 'viewport', content: 'width=device-width, initial-scale=1' },
      { hid: 'description', name: 'description', content: 'My description will surely go here.' },
    ],
    link: [
      { rel: 'icon', type: 'image/x-icon', href: '/favicon.ico' },
      { rel: 'manifest', href: '/site.webmanifest' },
    ],
    htmlAttrs: {
      lang: 'en'
    }
},
For each meta object, the hid is the unique internal identifier that you can override per page later.
In each page you can then override these by adding the same head object to your script:
<script>
import Vue from 'vue'
export default Vue.extend({
  head: {
    title: 'Demo',
    meta: [
      { hid: 'description', name: 'description', content: 'My demo page full of lorem ipsum.' },
    ]
  },
  async asyncData ({ $content }) {
    const page = await $content('demo').fetch()

    return {
      page
    }
  }
})
</script>
If you are dealing with dynamic content then use a function head() and return the same structure:
head() {
    return {
      title: this.page.title,
      meta: [
        { hid: 'description', name: 'description', content: this.page.description },
      ]
    }
},
Creating sitemaps
Sitemaps are not supported out of the box but we can add the module @nuxtjs/sitemap, install it with yarn, and then add it to the modules in your nuxt config file.
modules: [
  '@nuxtjs/sitemap',
],
Now in the same config file add a sitemap key for configuring this module. It will not pick up the routes automatically, so you either declare them manually or build a function that figures out all the possible routes you have based on your API data or file structure in content.
sitemap: {
    hostname: 'https://production.site',
    gzip: true,
    routes() {
      return getContentRoutes();
    },
}
Adding dark mode
Dark mode should already be enabled in Tailwind if you looked at the configuration above, but dark mode as a feature is not dependent on Tailwind; we will just be adding different classes to the <html> so you can use any CSS structure you want. Using @nuxtjs/color-mode we can add this feature really easily. This module doesn't use cookies, but instead leverages the local storage API.
Make sure you add the module to the buildModule in your nuxt configuration:
buildModules: [
    // https://go.nuxtjs.dev/typescript
    '@nuxt/typescript-build',
    // https://go.nuxtjs.dev/tailwindcss
    '@nuxtjs/tailwindcss',
    // https://color-mode.nuxtjs.org/
    '@nuxtjs/color-mode',
],
And you can add the configuration we will need for this module:
colorMode: {
    preference: 'system', // default value of $colorMode.preference
    fallback: 'light', // fallback value if not system preference found
    classPrefix: '',
    classSuffix: '',
},
Now let's add in a switcher in our layout/default.vue so that it's available on all pages:
<div>
  <div>Current mode: {{ $colorMode.value }}</div>
  <button @click="$colorMode.preference = 'light'">Switch to light mode</button>
  <button @click="$colorMode.preference = 'dark'">Switch to dark mode</button>
</div>
Obviously you can also put these in methods and make a much more visually appealing switcher. Now you can just do styling with tailwind, like so:
<div class="dark:bg-gray-800 dark:text-white">
Using typescript
If you've opted to have Typescript enabled you'll notice that it is being supported through the @nuxt/typescript-build module, and you can now start using it by scoping your <script> tags to 'ts':
<script lang="ts">
import Vue from 'vue'
export default Vue.extend({
  // I can typescript
})
</script>
And you can go ahead and use Typescript in other files or plugins. If you want to use Typescript in the nuxt configuration file and other files not compiled by Webpack have a look at the runtime module.
Building and deploying
Your static site is mostly ready now, all you need to do is run:
yarn buildAnd by default this will build your new static site in the dist directory with everything you need to run the website in that folder. You can FTP it to your server, or deploy it on Netlify or GitHub pages. Your website performance should also be very fast with loading and rendering, as most of your data will be pulled in on the build step.